


Tips on Using the Tenable Python SDK: How to Run Internal Scans, Scan Imports and Exports and More

The Tenable Python SDK was built to provide Tenable.io™ users with the ability to leverage the Tenable.io API by building their own scripts, programs and modules that can seamlessly interact with their data in the Tenable.io platform.
If you’re unfamiliar with how to get started using the Python SDK, refer to my past blog post or see the README for the project in github.
前提条件
The examples used in the post will assume:
- Python 2.7 or 3.4+ installed
- An administrator account in Tenable.io with generated API keys
- A Nessus scanner linked to Tenable.io
Running an internal scan
In this section, you’ll learn how to run an internal scan using the Tenable.io Python SDK.
The code
from tenable_io.client import TenableIOClientfrom tenable_io.api.scans import ScanCreateRequestfrom tenable_io.api.models import ScanSettingsclient = TenableIOClient(access_key='{YOUR ACCESS KEY}', secret_key='{YOUR SECRET KEY}')scanners = {scanner.name: scanner.id for scanner in client.scanners_api.list().scanners}template = client.scan_helper.template(name='basic')scan_id = client.scans_api.create(ScanCreateRequest(template.uuid,ScanSettings(‘{YOUR SCAN NAME}’,‘{YOUR SCAN TARGETS}’,scanner_id=scanners['{YOUR SCANNER NAME}'])))scan = client.scan_helper.id(scan_id)scan.launch()
注:Be sure to fill in the variables wrapped in curly brackets above with your own information.
The first several lines are importing the Tenable.io SDK client and models for creating your scan.
Next the client needs to be initialized with your API keys.from tenable_io.client import TenableIOClientfrom tenable_io.api.scans import ScanCreateRequestfrom tenable_io.api.models import ScanSettings
client = TenableIOClient(access_key='{YOUR ACCESS KEY}', secret_key='{YOUR SECRET KEY}')
The next line will create a dictionary of all linked scanner names with their scanner ID.
scanners = {scanner.name: scanner.id for scanner in client.scanners_api.list().scanners}
The next line will get the policy ID (internally known as the template ID) for the scan you’d like to run. In this example, the ‘Basic’ scan template is used.
template = client.scan_helper.template(name='basic')
Finally, you’ll use all these details to create a “CreateScanRequest” object that can be passed to the API to create your scan.
scan_id = client.scans_api.create(ScanCreateRequest(template.uuid,ScanSettings(‘{YOUR SCAN NAME}’,‘{YOUR SCAN TARGETS}’,scanner_id=scanners['{YOUR SCANNER NAME}'])))
注:Scan targets should be defined the same way they would be defined in the User Interface, using commas to separate targets.
With the scan successfully created, all that’s left is to get the “ScanRef” of your scan using its scan ID, which will give you access to all the scan controls, including launching the scan, as shown in the final line.
scan = client.scan_helper.id(scan_id)scan.launch()
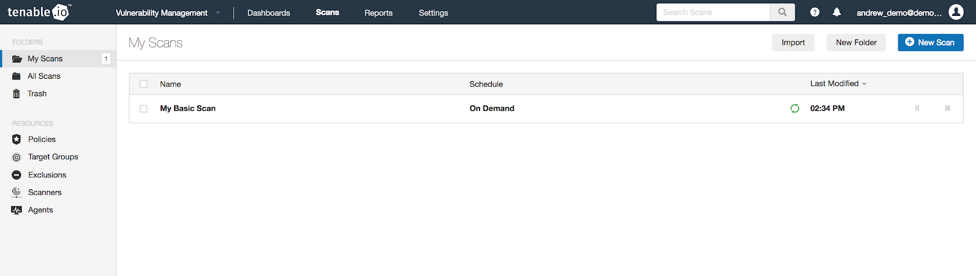
Shortly after running this script, you can confirm it worked by checking the Scans page in Tenable.io. In this case, the scan was named “My Basic Scan” and was set to scan three IPs.
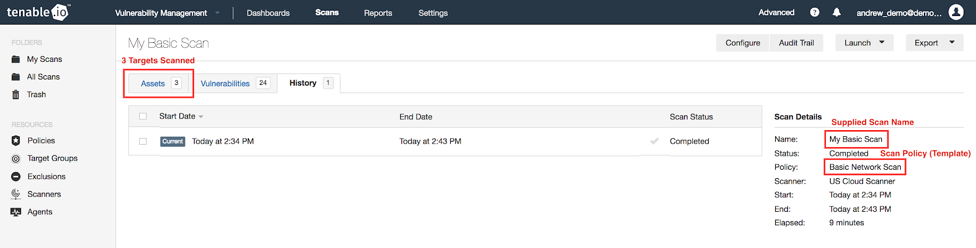
And after it completes.
Exporting a scan report by name
Another use case important to many users is the ability to export a previously run scan to share results with management or other stakeholders. This can also be done with ease using the SDK.
The code
from tenable_io.client import TenableIOClient

client = TenableIOClient(access_key='{YOUR ACCESS KEY}', secret_key='{YOUR SECRET KEY}')
scans = {scan.name: scan.id for scan in client.scans_api.list().scans}
scan = client.scan_helper.id(scans['{YOUR SCAN NAME}'])
scan.download('{YOUR SCAN NAME}.pdf')
As in the example above, first you will import the Tenable.io SDK client and initialize it using your API keys.
from tenable_io.client import TenableIOClient

client = TenableIOClient(access_key='{YOUR ACCESS KEY}', secret_key='{YOUR SECRET KEY}')
Next, you’ll generate a dictionary of your scan names and their associated ID.
scans = {scan.name: scan.id for scan in client.scans_api.list().scans}
Again, similar to the example above, you’ll create a “ScanRef” of your desired scan by supplying the scan’s name.
scan = client.scan_helper.id(scans['{YOUR SCAN NAME}'])
Finally, the last line will download the scan report, which is a PDF by default. Optionally, you can also pass in additional parameters from “ScanExportRequest” to export the report in a different format such as CSV or HTML.
scan.download('{YOUR SCAN NAME}.pdf')
Importing a Nessus scan into Tenable.io
Another solution that may be helpful to some users is the ability to import a Nessus scan from an unlinked scanner into Tenable.io to get a more complete view of their current Cyber Exposure.
The code
import os
from tenable_io.client import TenableIOClient

client = TenableIOClient(access_key='{YOUR ACCESS KEY}', secret_key='{YOUR SECRET KEY}')
dir_path = os.path.dirname(os.path.realpath(__file__))
file = os.path.join(dir_path, '{YOUR NESSUS FILE}')
client.scan_helper.import_scan(file, True)
The first few lines of this example are the same as the last example, with the addition of the Python os module, which will be used to locate the file to upload. In this example, the file should be in the same directory as the script being run.
import os
from tenable_io.client import TenableIOClient

client = TenableIOClient(access_key='{YOUR ACCESS KEY}', secret_key='{YOUR SECRET KEY}')
The next lines use the os module to locate the path of the running script, then get the full path of the scan results file you plan to upload.
dir_path = os.path.dirname(os.path.realpath(__file__))file = os.path.join(dir_path, '{YOUR NESSUS FILE}')
Finally, you can use the scan_helper “import_scan” function to upload your scan result.
client.scan_helper.import_scan(file, True)
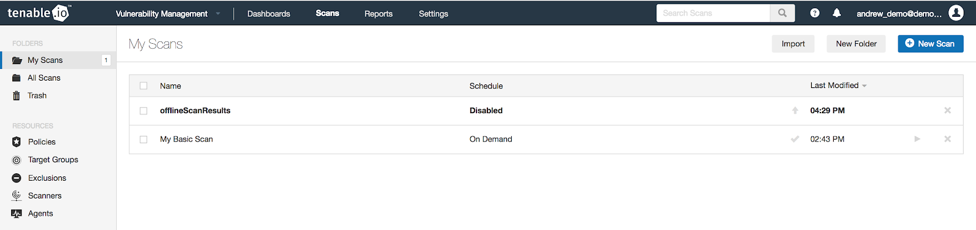
After running the script, you should be able to confirm it worked by checking the Scans page in Tenable.io for your uploaded scan. In this example, the scan was named “offlineScanResults.nessus”.
Tips
One tip that can come in handy when using multiple scripts or deploying your scripts to other machines is to set your API keys in an INI file or as environment variables for the Tenable client to use.
INI example
Create a new file in the same directory that you will execute your script from called “tenable_io.ini”. You can format this file like the example below. Notice you can also easily set the logging level when using this approach. If you have a script that is failing for unknown reasons, setting this to INFO or DEBUG can be helpful.
[tenable_io]
access_key = 1111d58e443e08e080790193e27ae151c16b0415270b738137e50eecbcc08d74
secret_key = 22220bf73a6bcb0cf4bcd9cf5839bff21357f2cd81884e4984e8ed4ecd4b6d83
logging_level = ERROR
Environment variables
If you’d rather not go the route of the INI file, you can also set the TENABLEIO_ACCESS_KEY and TENABLEIO_SECRET_KEY environment variables, which will supply your API keys to the client.
For more information
相关文章
Tenable.io: To control or not to control, that is the question
October 10, 2022For large deployments of Tenable, where Tenable.io is shared across geographical or business boundaries, you can leverage role-based access control (RBAC) to logically segment scan data or, where required, restrict access to its scan data. In this blog, we’ll explain the configuration required to implement RBAC successfully.

Tenable.io and Tenable.io WAS Achieve FedRAMP Authorization
October 7, 2021Six reasons why FedRAMP authorization for Tenable.io and Tenable.io Web App Scanning (WAS) is important for our customers and partners. After lengthy and rigorous testing under the U.S. Federal Risk ...

From Vulnerability Discovery to Remediation: How Tenable and HCL BigFix Can Help
June 30, 2021Reducing the time required to move from vulnerability assessment to remediation is a never ending challenge for most organizations. Here's how the integration between Tenable and HCL BigFix can help y...

Kinsing Malware Hides Itself as a Manual Page and Targets Cloud Servers
May 16, 2024Tenable Cloud Security Research Team has recently discovered that Kinsing malware, known for targeting Linux-based cloud infrastructures, exploits Apache Tomcat servers with new advanced stealth techniques. Explore our analysis and the indicators of compromise in this report.
Microsoft’s May 2024 Patch Tuesday Addresses 59 CVEs (CVE-2024-30051, CVE-2024-30040)
May 14, 2024Microsoft addresses 59 CVEs in its May 2024 Patch Tuesday release with one critical vulnerability and three zero-day vulnerabilities, two of which were exploited in the wild.
Tenable Cloud Security Study Reveals a Whopping 95% of Surveyed Organizations Suffered a Cloud-Related Breach Over an 18-Month Period
May 14, 2024The finding from the Tenable 2024 Cloud Security Outlook study is a clear sign of the need for proactive and robust cloud security. Read on to learn more about the study’s findings, including the main challenges cloud security teams face, their strategies for better protecting their cloud infrastructure and the tools they use to measure success.

- Tenable.io